Blitzz allow you to customize the invitation message sent to guests when they join a session via SMS or email. Personalizing invites helps reinforce your brand and ensures the message fits your communication.
Quick Read
- This article explains how to customize the SMS and Email invitations sent to your guest users to join a session.
- WhatsApp invitations cannot be customized due to Facebook’s guidelines.
- There are certain limitations on character length and the use of special characters (see below).
SMS Invite Templates
Personalize Your Invites in Three Easy Steps
- Step 1: Create a New SMS Template
- Step 2: Assign SMS Template to a collaboration profiles
- Step 3: Test your SMS Template
- Example of SMS Invitation
Step 1: Create a New SMS Template
How to Create a New SMS Template
You can create new templates if you send invites in multiple languages or support different use cases. There are two ways to create a new template:
New Template:
Click the New Template button to create a template from scratch. Fill out the details in the pop-up window:
- Template Name: The name of the template, visible before sending an invite. Use a clear, friendly name (e.g., French Invite, Recording ON, etc.).
- Message Body: The message that will be sent to the end user.
Preview: A non-editable field that shows a preview of your message.

Clone an existing template:
You can clone an existing template and modify it. This copies the text from the template you choose to clone, and you can edit it after cloning.
Edit the Default SMS Template
If you don’t need to send different invitations, you can simply edit the default template. To edit it, click the three dots (More menu) and select Edit.
Note: Each account can have only one default template.
Message Guidelines
- 100-character limit: This is limited to a maximum of 100 characters to keep messages concise and compliant with our GDPR and privacy communication policies.
- Special characters: While we understand the need for special characters in many languages, some may be misinterpreted by SMS carriers or blocked depending on the region. To ensure high delivery rates, unsupported special characters are restricted. The following special characters are allowed:
0-9 (Digits) a-z (Lowercase letters) A-Z (Uppercase letters) - (Dash) . (Full stop) : (Colon) (Space) / (Forward Slash) |
The image below shows an example of using different templates for different use cases

Step 2: Assign SMS Template to a collaboration profiles
After creating your template, you will need to assign it to specific Collaboration Profiles. Each Collaboration Profile can have only one template. Follow the steps below to assign the template to a Collaboration Profile.
- Login as an Admin and click Session Settings in the left sidebar.
- Click Collaboration Profiles from the expanded submenu.
- Select the Collaboration Profiles you would like to assign the template.
- In the Settings tab, locate the SMS Invitation option and toggle the switch ON. Select the SMS Invite Template from the dropdown.
- Click Save to apply these settings to the Collaboration Profile.

Step 3: Test your SMS Template
Before using the template live, verify how it looks:
- Navigate to the Agent Portal and create a new session.
- Select the Collaboration Profile to which you assigned the SMS template. If you have more than one, select the appropriate Collaboration Profile and click Next.
- In the SMS tab, a preview of the template will be displayed in the preview box.

Example of SMS Invitation
Shows a sample SMS message sent to guests, highlighting how the invitation text and session link appear on a mobile device.

Email Invite Templates
Personalize Your Invites in Three Easy Steps
- Step 1: Create a New Email Template
- Step 2: Assign Email Template to a collaboration profiles
- Step 3: Test your Email Template
- Example of Email Invitation
Step 1: Create a New Email Template
How to Create a New Email Template
You can create new templates if you send invites in multiple languages or support different use cases. There are two ways to create a new template:
New Template:
Click the New Template button to create a template from scratch. Fill out the details in the pop-up window:
- Template Name: The name of the template. Use a clear, friendly name (e.g., French Invite, Recording ON, etc.).
- Sender Email: Select the sender email address from the dropdown list.
- Sender Name: Enter the sender name. You can also insert tags such as Host First Name, Host Last Name, or Company Name.
- Subject: Enter the email subject. You can include tags like Host First Name, Host Last Name, Company Name, or Reference.
Message Body: The content of the message sent to the end user. You can create and customize the template in this section.

Clone an existing template:
You can clone an existing template and modify it. This copies the text from the template you choose to clone, and you can edit it after cloning.
Edit the Default Email Template
If you don’t need to send different invitations, you can simply edit the default template. To edit it, click the three dots (More menu) and select Edit.
Note: Each account can have only one default template.
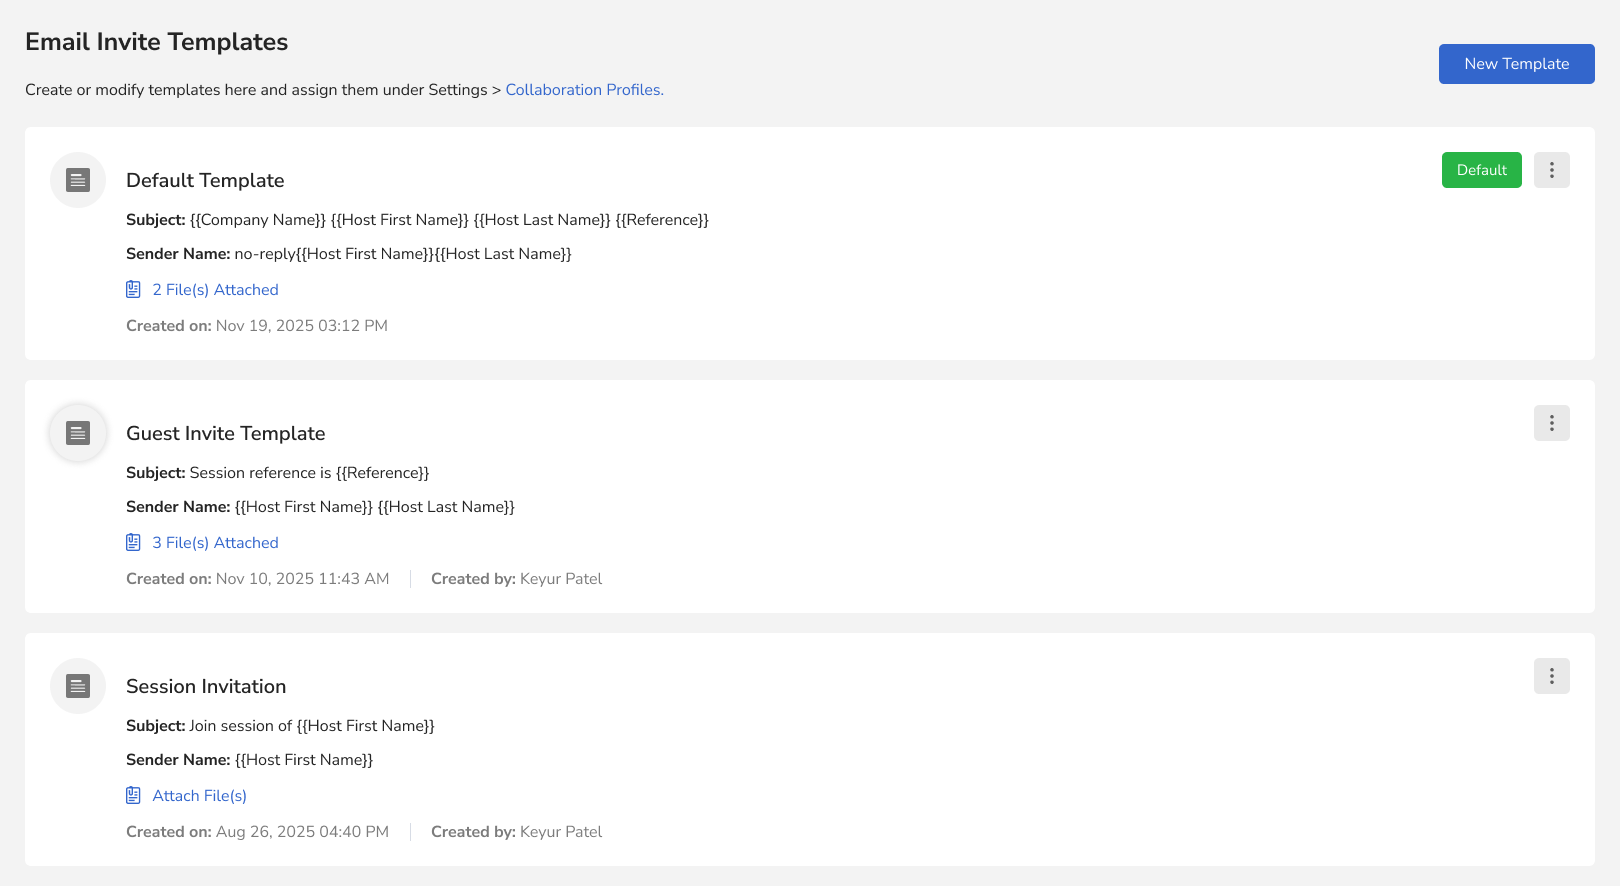
The image below shows an example of using different templates for different use cases
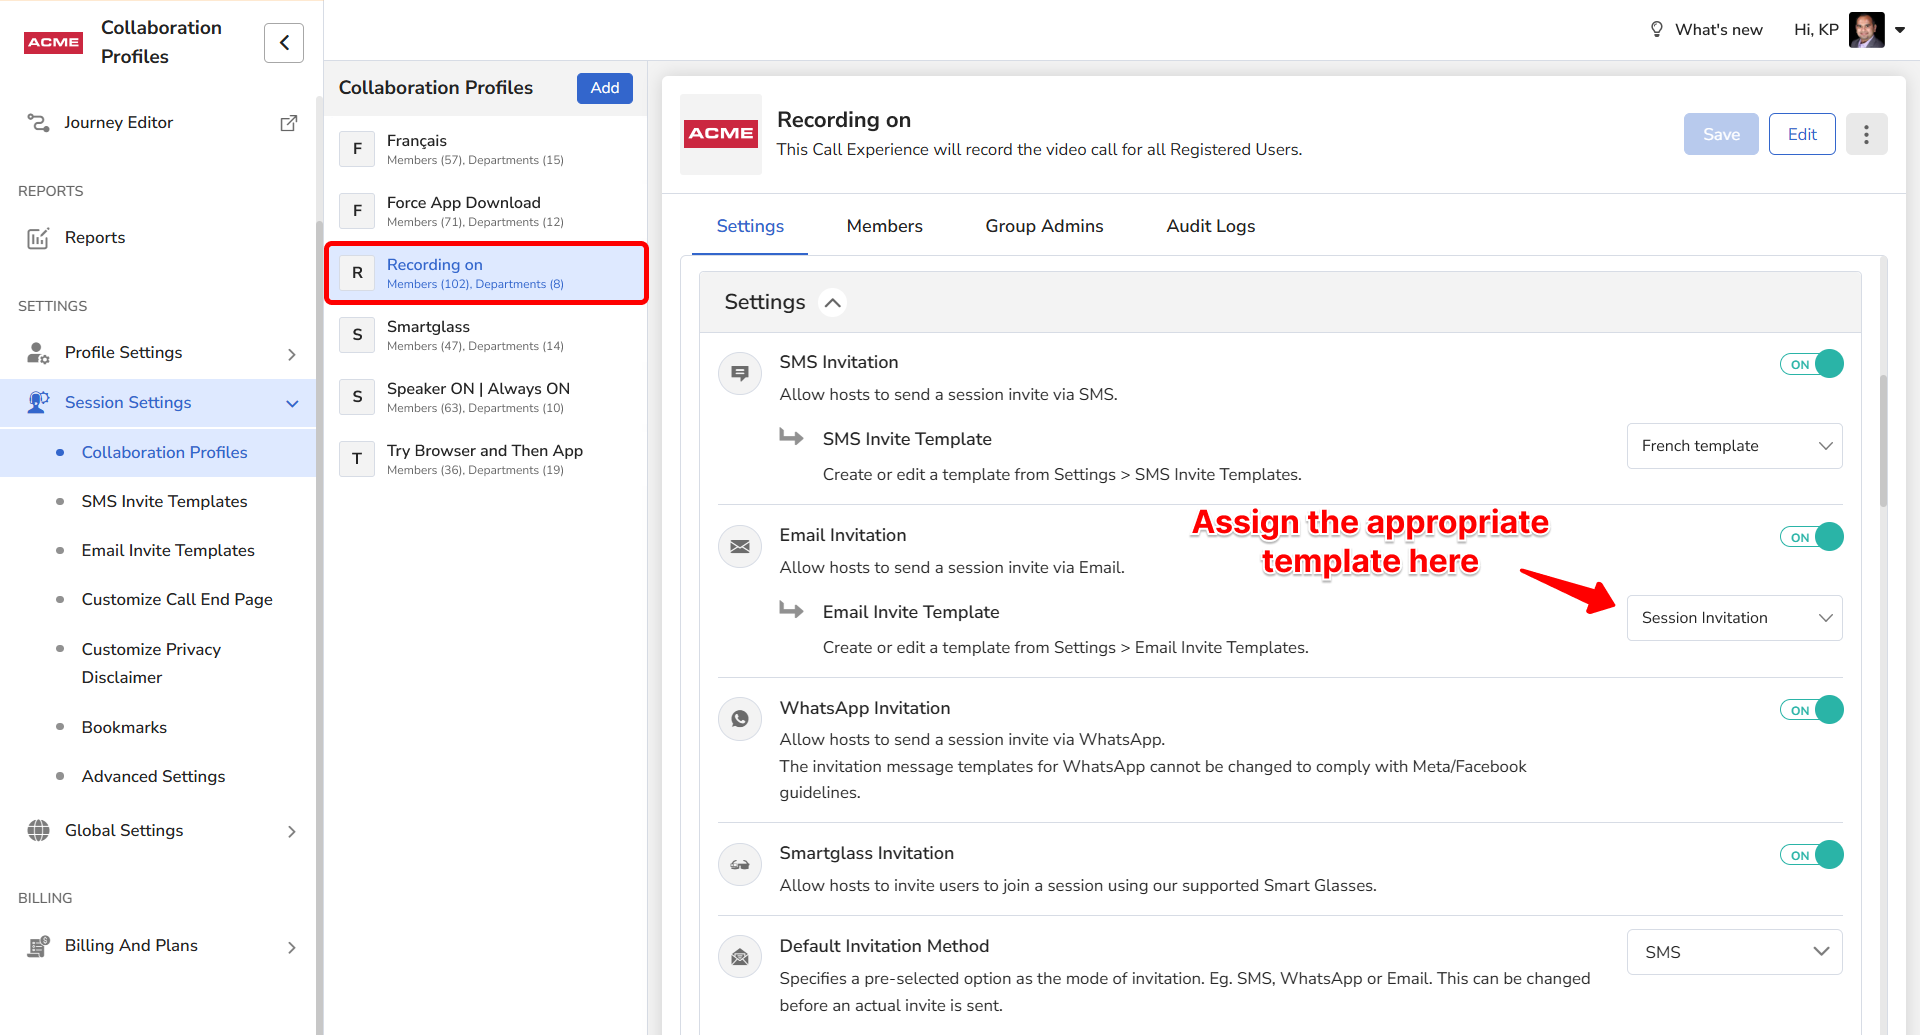
Step 2: Assign Email Template to a collaboration profiles
After creating your template, you will need to assign it to specific Collaboration Profiles. Each Collaboration Profile can have only one template. Follow the steps below to assign the template to a Collaboration Profile.
- Login as an Admin and click Session Settings in the left sidebar.
- Click Collaboration Profiles from the expanded submenu.
- Select the Collaboration Profiles you would like to assign the template.
- In the Settings tab, locate the Email Invitation option and toggle the switch ON. Select the Email Invite Template from the dropdown.
- Click Save to apply these settings to the Collaboration Profile.
Step 3: Test your Email Template
Before using the template live, verify how it looks:
- Navigate to the Agent Portal and create a new session.
- Select the Collaboration Profile to which you assigned the Email template. If you have more than one, select the appropriate Collaboration Profile and click Next.
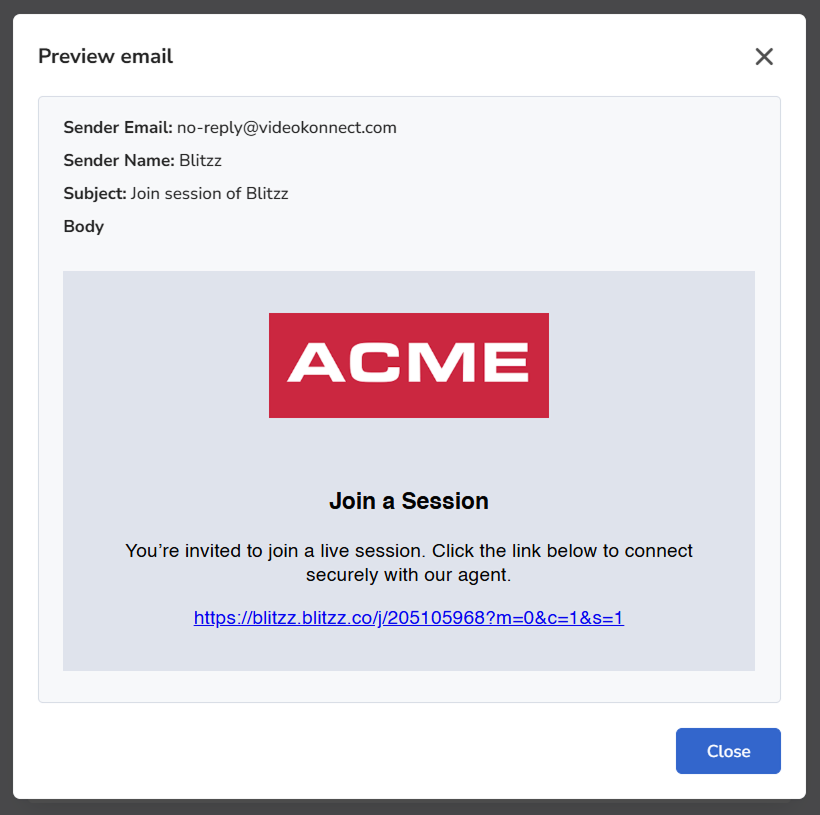
- In the Invite by Email tab, Click on the Preview email, a preview of the template will be displayed in the modal.
Example of Email Invitation
Shows a sample Email invite sent to guests, and shows your customized invitation template along with a secure link for the guest to join the session.
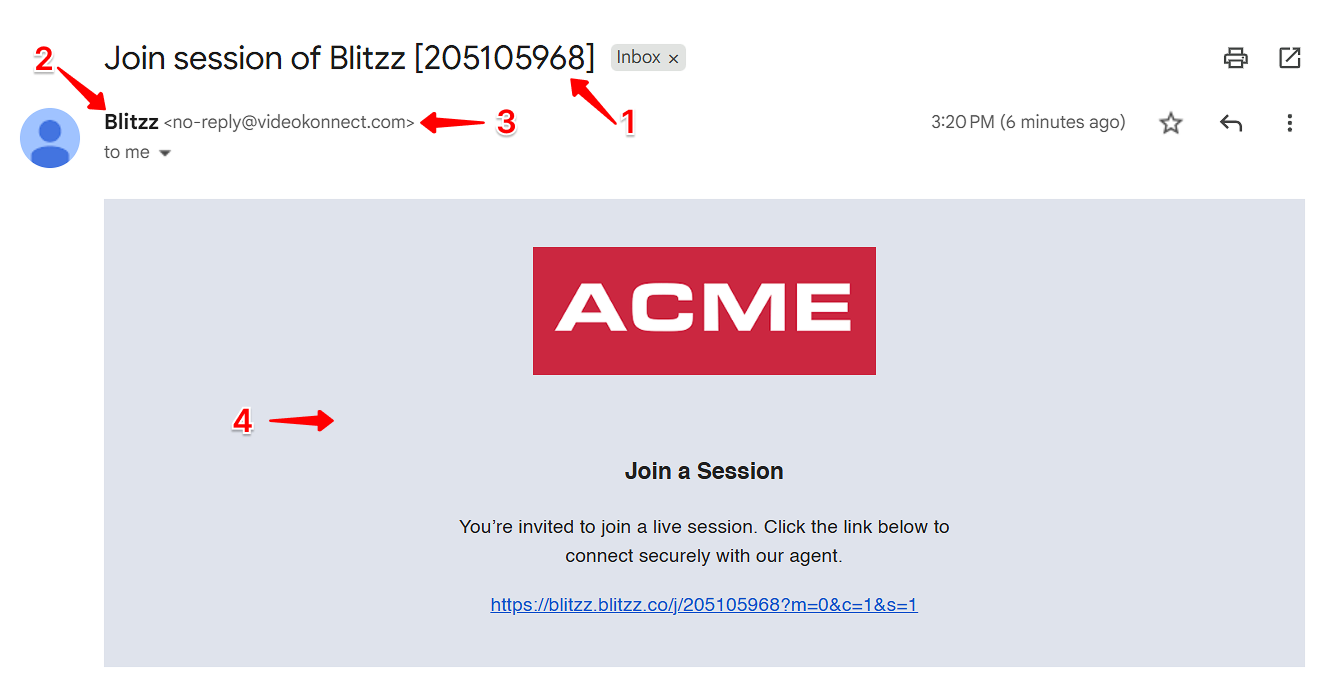
- Email Subject
- Sender Name
- Sender's email address is always no-reply@videokonnect.com (Can I change this?)
- Email Template Body